We provide a simple example (one image from the Kyoto summer2autumn dataset) for you to translate an UHR image with our DN.
Download example data
$ ./download.sh
$ unzip simple_example.zip
Environment preparation
Please check your GPU driver version and modify Dockerifle accordingly
Then, execute
$ docker-compose up --build -d
Get into the docker container
$ docker exec -it dn-env bash
Inference
In the docker container, please execute
$ python3 transfer.py -c data/japan/config.yaml
Then, you can see a translated image at experiments/japan_CUT/test/IMG_6610/combined_dn_10.png
To see the image conveniently, you can leverage the provided visualization.ipynb. The setup of jupyter notebbok can be achived by
a. modify a port mapping setting in docker-compose.yml; e,g, - 19000:8888
b. install jupyter in the container
c. run your jupyter notebook by nohup jupyter notebook --ip=0.0.0.0 --port=8888 --allow-root &
d. open the jupter notebook service on your port (19000 here)
Datasets
real2paint Dataset
For the real domain, please download the UHDM dataset from its official website. For the painting domain, we have curated a dataset of high-resolution Vincent van Gogh paintings, which can be downloaded at link1 or link2. Please note that we do not own these images; users should ensure their use does not trigger legal issues.
Проектная работа: “Путешествие по России”. Реализована в рамках учебной и практической работы на платформе Яндекс.Практикум в факультете “Веб-разработчик”
Демо сайта
Описание
Путешествие по России – это типовой однастраничный сайт про российский внутренний туризм, который корректно отображается и на компьютере, и на телефоне. В проектной работе была применена работа с макетом в Figma, построение сложных сеток, разширенные возможности HTML и CSS. Является реализация адаптивной вёрстки посредством Flexbox, Grid Layout и Media queries. При вёрстке использован подход Desktop First.
Check out enilsen16/awesome-hedwig for a curated list of adapters, responders, and other resources.
Getting started
Hedwig ships with a console adapter to get you up and running quickly. It’s
great for testing how your bot will respond to the messages it receives.
To add Hedwig to an existing Elixir application, add :hedwig to your list of
dependencies in your mix.exs file:
defpdepsdo[{:hedwig,"~> 1.0"}]end
Update your applications list to include :hedwig. This will ensure that the
Hedwig application, along with it’s supervision tree is started when you start
your application.
defapplicationsdo[applications: [:hedwig]]end
Fetch the dependencies:
$ mix deps.get
Create a robot module
Hedwig provides a convenient mix task to help you generate a basic robot module.
Run the following and follow the prompts:
$ mix hedwig.gen.robot

Welcome to the Hedwig Robot Generator!

Let's get started.

What would you like to name your bot?: alfred

Available adapters

1. Hedwig.Adapters.Console

Please select an adapter: 1

* creating lib/alfred
* creating lib/alfred/robot.ex
* updating config/config.exs

Don't forget to add your new robot to your supervision tree
(typically in lib/alfred.ex):

    worker(Alfred.Robot, [])
The generator will automatically generate a default configuration in
config/config.exs. You will need to customize it further depending on the
adapter you will use.
This is mainly to setup the module to be compiled along with the adapter. An
adapter can inject functionality into your module if needed.
You can start your bot as part of your application’s supervision tree or by
using the supervision tree provided by Hedwig.
Starting as part of your supervision tree:
# add this to the list of your supervisor's childrenworker(Alfred.Robot,[])
Trying out the console adapter:
mix run --no-halt

Hedwig Console - press Ctrl+C to exit.

The console adapter is useful for quickly verifying how your
bot will respond based on the current installed responders.

scrogson> alfred help
alfred> alfred help <query> - Displays all help commands that match <query>.
alfred help - Displays all of the help commands that alfred knows about.
alfred: ping - Responds with 'pong'
scrogson>
Starting bots manually:
# Start the bot via the module. The configuration options will be read in from# config.exs{:ok,pid}=Hedwig.start_robot(Alfred.Robot)# You can also pass in a list of options that will override the configuration# provided in config.exs (except for the adapter as that is compiled into the# module).{:ok,pid}=Hedwig.start_robot(Alfred.Robot,[name: "jeeves"])
Registering your robot process
If you want to start, stop, and send messages to your bot without keeping track
of its pid, you can register your robot in the handle_connect/1 callback in
your robot module like so:
Process registration via Process.register/2 is simple. However, since the name
can only be an atom it may not work for all use-cases. If you are using the same
module for many robots, you’ll need to reach for something more flexible like:
# Start the robotHedwig.start_robot(Alfred.Robot)# Get the pid of the robot by namepid=:global.whereis_name("alfred")# Start a new robot with a different nameHedwig.start_robot(Alfred.Robot,[name: "jeeves"])# Get the pidpid=:global.whereis_name("jeeves")# Stop the robotHedwig.stop_robot(pid)
Sending Messages
# Get the pid of the robotpid=:global.whereis_name("alfred")# Create a Hedwig messagemsg=%Hedwig.Message{type: "groupchat",room: "my_room@example.com",text: "hello world"}# Send the messageHedwig.Robot.send(pid,msg)
Building Responders
Responders are processes that will handle incoming messages.
All that’s needed is to use Hedwig.Responder and use the hear/2, or
respond/2 macros to define a pattern to listen for and how to respond in
the block when a message matches.
Here is an example:
defmoduleMyApp.Responders.GreatSuccessdo@moduledoc""" Borat, Great Success! Replies with a random link to a Borat image when a message contains 'great success'. """useHedwig.Responder@links["http://mjanja.co.ke/wordpress/wp-content/uploads/2013/09/borat_great_success.jpg","http://s2.quickmeme.com/img/13/1324dfd733535e58dba70264e6d05c9b70346204d2cacef65abef9c702746d1c.jpg","https://www.youtube.com/watch?v=r13riaRKGo0"]@usage""" <text> (great success) - Replies with a random Borat image. """hear~r/great success(!)?/i,msgdoreplymsg,random(@links)endend
Hear vs. Respond
The two responder macros are use for different reasons:
hear – matches messages containing the regular expression
respond – matches only when prefixed by your robot’s configured name or aka value.
Testing responders:
Hedwig ships with a ExUnit-based module sepecifically made to test responders: Hedwig.RobotCase.
In order to test the above responder, you need to create an ExUnit test case:
# test/my_app/responders/great_success_test.exsdefmoduleMyApp.Responders.GreatSuccessTestdouseHedwig.RobotCase@tagstart_robot: true,name: "alfred",responders: [{MyApp.Responders.GreatSuccess,[]}]test"great success - responds with a borat url",%{adapter: adapter,msg: msg}dosendadapter,{:message,%{msg|text: "great success"}}assert_receive{:message,%{text: text}}assertString.contains?(text,"http")endend
To run the tests, use mix test
@usage
The @usage module attribute works nicely with Hedwig.Responders.Help. If you
install the help handler, your bot will listen for <your-bots-nickname> help
and respond with a message containing all of the installed handlers @usage
text.
License
The MIT License (MIT)
Copyright (c) 2015 Sonny Scroggin
Permission is hereby granted, free of charge, to any person obtaining a copy
of this software and associated documentation files (the “Software”), to deal
in the Software without restriction, including without limitation the rights
to use, copy, modify, merge, publish, distribute, sublicense, and/or sell
copies of the Software, and to permit persons to whom the Software is
furnished to do so, subject to the following conditions:
The above copyright notice and this permission notice shall be included in all
copies or substantial portions of the Software.
THE SOFTWARE IS PROVIDED “AS IS”, WITHOUT WARRANTY OF ANY KIND, EXPRESS OR
IMPLIED, INCLUDING BUT NOT LIMITED TO THE WARRANTIES OF MERCHANTABILITY,
FITNESS FOR A PARTICULAR PURPOSE AND NONINFRINGEMENT. IN NO EVENT SHALL THE
AUTHORS OR COPYRIGHT HOLDERS BE LIABLE FOR ANY CLAIM, DAMAGES OR OTHER
LIABILITY, WHETHER IN AN ACTION OF CONTRACT, TORT OR OTHERWISE, ARISING FROM,
OUT OF OR IN CONNECTION WITH THE SOFTWARE OR THE USE OR OTHER DEALINGS IN THE
SOFTWARE.
MatrixControl is an Arduino library for MAX7219 and MAX7221 Led Matrix display drivers.
Background
This library was developed based on this.
The original library also supports 8-segment LEDs, but this library does not support 8-segment LEDs.
Only supports cascaded 8×8 Led Matrix.
Change from original
While the original library is highly versatile, the processing of cascaded LEDs is inefficient.
This library speeds up the processing of cascaded LEDs.
The original library used software SPI, but this library can use both software SPI and hardware SPI.
Package is work in progress! If you encounter errors / problems,
please file an issue or make a PR.
Introduction
This package parses a git repository history to collect comprehensive
information about the activity in the repo. The parsed data is made
available to the user in a tabular format. The package can also generate
reports based on the parse data. You can install the development version
from GitHub.
remotes::install_github("lorenzwalthert/gitsum")
There are two main functions for parsing the history, both return
tabular data:
parse_log_simple() is a relatively fast parser and returns a
tibble with one commit per row. There is no file-specific
information.
parse_log_detailed() outputs a nested tibble and for each commit,
the names of the amended files, number of lines changed ect.
available. This function is slower.
report_git() creates a html, pdf, or word report with the parsed log
data according to a template. Templates can be created by the user or a
template from the gitsum package can be used.
Since we used parse_log_detailed(), there is detailed file-specific
information available for every commit:
tbl$nested[[3]]
#> # A tibble: 3 x 5#> changed_file edits insertions deletions is_exact#> <chr> <int> <int> <int> <lgl> #> 1 DESCRIPTION 6 5 1 T #> 2 NAMESPACE 3 2 1 T #> 3 R/get_log.R 19 11 8 T
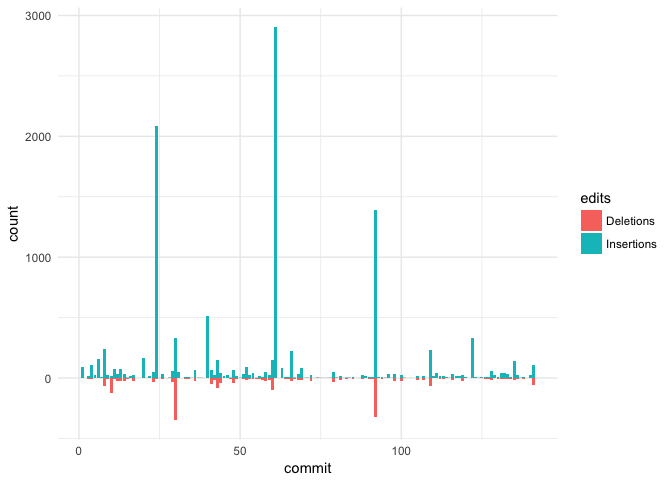
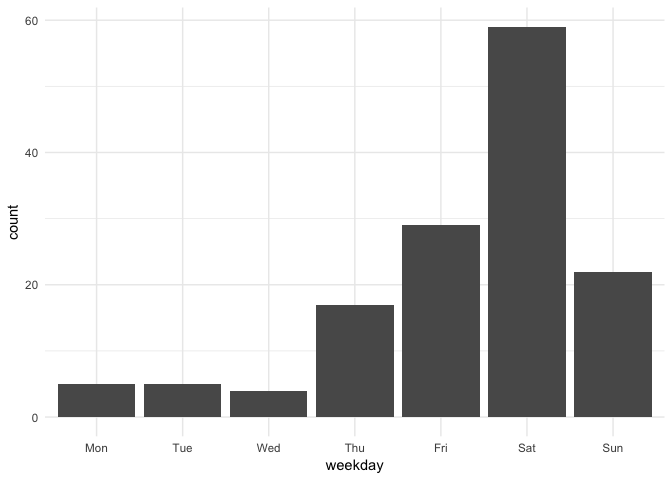
Since the data has such a high resolution, various graphs, tables etc.
can be produced from it to provide insights into the git history.
Examples
Since the output of git_log_detailed() is a nested tibble, you can
work on it as you work on any other tibble. Let us first have a look at
who comitted to this repository:
log<- parse_log_detailed()
log %>%
group_by(author_name) %>%
summarize(n= n())
#> # A tibble: 3 x 2#> author_name n#> <chr> <int>#> 1 Jon Calder 2#> 2 jonmcalder 6#> 3 Lorenz Walthert 141
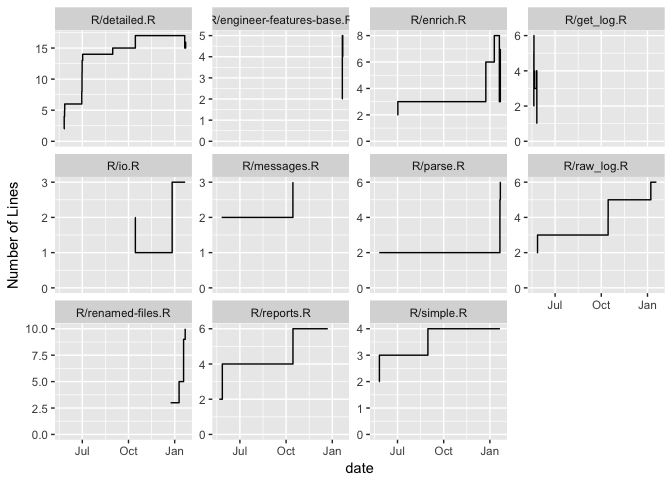
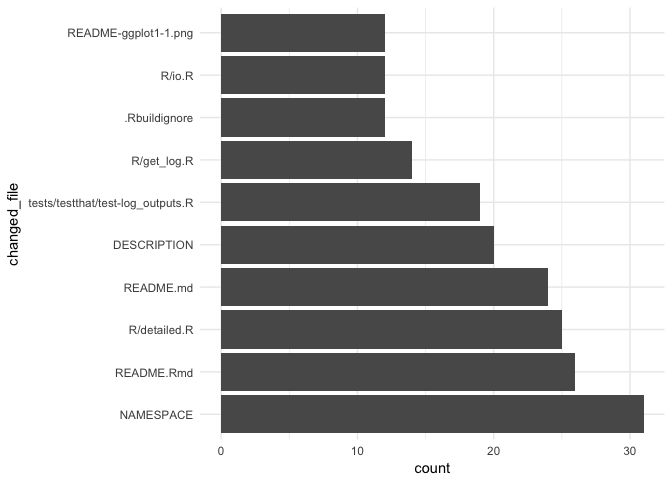
We can also investigate how the number of lines of each file in the R
directory evolved. For that, we probaly want to view files with changed
names as one file. Also, we probably don’t want to see boring plots for
files that got changed only a few times. Let’s focus on files that were
changed in at least five commits.
Optional# implements what’s known as an optional type: A type that represents a value that may not exist. You can use it as the return type of a function that may or may not return an int, such as:
Or as the parameter type of a function that accepts an optional value of type T:
T FirstOrDefault(Optional<T> @default = default(Optional<T>))
{
	//...
}
Or as the type of a member that may or may not have a value:
public class Creature
{
	public Optional<bool> IsEnemy {get;}
}
Now, it’s true that reference types can be null to represent a missing value, and nullable value types are also a thing. But null isn’t very good at that job (or any job, really).
Why not null?
If you’re not interested in these rationalizations, you can skip ahead.
null is ambiguous
All reference types are nullable, and technically null is a valid value for them. So getting null is totally ambiguous: it may indicate that the value exists and it is null, that the null got in there due to a bug, or that it was used explicitly to indicate a missing value.
Similarly, there is no way to indicate in a function signature that a parameter or return value is optional.
null doesn’t work with generics
Say you have a generic method and you want it to return an optional value of type T (that is, the value may or may not exist). You might write it like this:
public T TryGetValue<T>(string key)
{
	return null;
}
That doesn’t work though, since regular structs can’t have the value null.
So you might write it like this:
public T? TryGetValue<T>(string key)
{
	return null;
}
Nope, doesn’t work either. In that case, T has to be a struct because only structs can be Nullable<T>.
If you do have a proper optional type, you can write stuff like this:
public Optional<T> TryGetValue<T>(string key)
{
	return Optional.None();
}
null breaks type safety
null isn’t really a proper value for any type (except arguably for nullable value types) because it doesn’t support its methods, not even basic ones like GetHashCode. When you write this:
object o = null;
You’re going behind the type system’s back and calling an object something that just isn’t one.
You might as well give up and just use dynamic.
nulls have a tendency to spread
Even if you use null as an optional value, null values have a tendency to spread. Some of the reasons involve the as and ?. operators, which aren’t always the best thing:
public string MakeIntoString(object maybeNull)
{
	//return maybeNull.ToString();
	//ugh, NullReferenceException! Fix it real quick:
	return maybeNull?.ToString();
	//whew
}
The above code doesn’t really solve the problem, it just passes it along to the next consumer who’ll also have to wonder how a null got there.
null has no type information
null is just null. It’s something that really doesn’t exist. It doesn’t have a type, even though it exists under the illusion of one.
When your program crashes because of a NullReferenceException, you can’t tell the type of the missing value at runtime nor can you see any relevant debug information. You just see the word null. Good luck figuring out why it’s there and what it’s supposed to be. This is especially important if you’re working on objects.
Definitions
An Optional is an instance of the Optional<T> class. It indicates a potentially missing value of type T, which is called the inner type. This potentially missing value is called the Optional’s inner value.
An Optional is immutable, and can be constructed in one of two states:
The Some state, also written Some(x). It wraps an inner value, which is the x. If we want to talk about an Optional with a particular inner type T, we can say it’s a Some<T>.
The None state, which indicates a missing value. The None state is another instance of Optional<T>, so the missing value is still of a particular type. This is an implementation detail in some ways (all Nones are equal, as we’ll discuss later), but it does provide more debug information. When we want to talk about None of a particular inner type, we can say NoneOf<T>.
The Optional<T>.Value property lets us access the inner value of the Optional. If there is no inner value, the operation throws an exception. Almost all other methods work even when called on None Optionals, though.
The Basics of Optional#
The fundamental aspects of the Optional type provided by Optional#.
Optional<T> is a struct
The Optional<T> type is a struct, so it can’t be null itself.
Its uninitialized/default state is None. In particular, default(Optional<T>) returns a Optional with the inner type of T, in its None state. This enables all kinds of cool behaviors, like using it as an optional parameter:
public void Example(Optional<int> opt = default(Optional<int>))
{
	if (opt.IsNone)
	{
		//...
	}
}
This has a few cool consequences:
It supports all of its methods in all states, except those that require an inner value (e.g. the .Value property) `.
Even if it’s in its None state, it can hold additional information, such as the inner type and a reason for the lack of a value.
Immutability
Optionals are immutable objects that cannot be changed once created. This allows them to be safely used as keys in a dictionary or for other purposes. An Optional cannot change its state from Some(x) to None.
The Features of Optional#
Optional# has tons of cool features that should cover almost every use-case involving manipulating optional values by themselves.
Untyped None value
In additional to regular typed Optionals that may indicate a missing value, we use another struct to indicate a missing value where the type of the value is unknown or unspecified. Its purpose is to make syntax more concise in some cases.
This object can be accessed through Optional.None(). It is of the type ImplicitNoneValue, which is normally hidden from the IDE using a collection of attributes (the reason being, you should never need to refer to this type explicitly and seeing it will only confuse users).
This object is implicitly convertible to any Optional<T>, resulting in a valid Optional indicating a missing value. This allows code like this:
Optional<int> x = Optional.None(); //implicit conversion
Optional<string> y = Optional.None();
That’s also the main reason for its existence.
An ImplicitNoneValue implements only them main methods available to Optional<T>, but it behaves like a valid Optional when used polymorphically through the interface IAnyOptional. It is also equal to a None value of any type.
It can be seen as the equivalent of IEnumerable as compared to IEnumerable<T>, with the added restriction that it can only be empty.
Like other Optionals, it too has a Reason property. This property is conserved when it is converted to an Optional<T>.
Supports equality, including GetHashCode
This means that it can be used in dictionaries and sets.
Optionals support equality with other Optionals, even if they are of a different type. Two Optionals are equal if their inner values are equal, or if they are both None. Optionals aren’t equal to concrete values, even in their Some state.
Equality to all is provided by the .Equals(object) overridden method. However, Optionals implement IEquatable for several types and also provide overloaded == and != operators.
Enhanced debugging and error reporting
Optional# uses all all kinds of features to make debugging as clear and intuitive as possible. Error messages thrown by Optionals are also a lot more informative than NullReferenceExceptions and than most other libraries.
You can abstract over the T
All Optionals implement the IAnyOptional interface, which lets you abstract over all Optionals, whatever their inner type, in a polymorphic manner. This is used by a number of features, such as equality tests.
LINQ-like Transformations
Optionals support many transformations that follow the LINQ naming conventions and API. This makes sense because you can view Optionals as collections with zero or one elements, and many LINQ operations make sense on them.
Some of these are also similar to conditional operators such as ?? and ?., but safer.
Examples include:
o.Select(x => x + 5), which transform the inner value or returns None.
o.Where(x => x % 2), which filters the inner value.
o.OfType<T>(), which makes the sure the inner value is of some type T and returns an Optional with that inner type.
o.Or(5), returns the inner value or another default value.
These methods also allow you to use syntax like this:
var x = from v in Optional.Some(5)
		where v % 2 == 0
		select 2 * v;
Doing so isn’t recommended though.
Conversion Operators
Optionals support explicit conversion to their inner type T (that can throw an exception) and implicit conversion from an inner type.
Conversion Methods
Furthermore, Optional# provides a variety of conversion methods that allow converting to and from other objects, such as reference types and nullable value types.
User-customizableReason property
Sometimes, it’s important (from debugging purposes) to know why a value does not exist. Valid reasons for an Optional having no inner value include:
Conversion from a null value.
A search in a collection produces no elements.
Parsing of a value as a particular type T failed.
Optionals can carry additional information to describe these and other situations through their Reason property. This is a nullable property that contains additional information (the reason it’s not Optional is that this would create a circular dependency that’s hard to get around). Transformations on Optionals intelligently preserve the reason and many methods that result in Optionals accept an optional reason parameter. The reason can then be propagated to debugging or error handling code that can log it.
It’s also possible to explicitly set the Reason through the WithReason method that returns a new Optional with a different Reason.
The Reason information is supplied when a MissingOptionalValueException is thrown.
Warning: This property is included to make debugging easier. Don’t use it to store important information (i.e. information that can change what your code does).
The Reason property is ignored when testing for equality and in many other situations.
Optional#.More
Optional# comes with a companion assembly that helps integrate it into the .NET Framework. This library offers a number of cool features that aren’t necessarily for manipulating Optionals directly. Instead, they are features simply best implemented using an Optional type.
Conditional Access
Optional#.More offers a number of conditional access extension methods that try to get an element using a predicate, index, or key. If such an element exists, it’s wrapped in Some and returned. If no such element exists, None is returned.
Examples include:
TryFirst
TryPick
TryKey
TryElementAt
Extra LINQ methods
This library also provides a number of LINQ methods that are best expressed using Optionals.
Example: The Choose method is a blend of Where and Select. It applies a function on every element in a collection, returning either Some(x) or None. Then it returns the inner values in a (possibly empty) sequence.
Also: Provides methods such as FlattenSequence that work on a sequence of Optionals or an Optional of a sequence that flattens it into a sequence of values (possibly an empty one).
Parsing
This library also includes static methods for parsing different data types, such as long or even DateTime.
These are included in the TryParse static class, containing pretty much every rendition of a T.TryParse method that appears in the .NET Framework, returning an Optional<T> instead of something involving an out parameter.
Examples include:
TryParse.Int32("12")
TryParse.Char('a')
And even, TryParse.Enum<TEnum>
Parallelism
Await on Optional<Task<T>>
*Requires C# 7 *
Includes extension methods for objects of type Optional<Task<T>> that allow you to write syntax like this:
Optional<Task<T>> task = Optional.NoneOf<Task<T>>();
Optional<T> result = await task;
This has the effect of returning None<T> when task is None immediately (i.e. synchronously) or, if a task is present, running the task and returning the value.
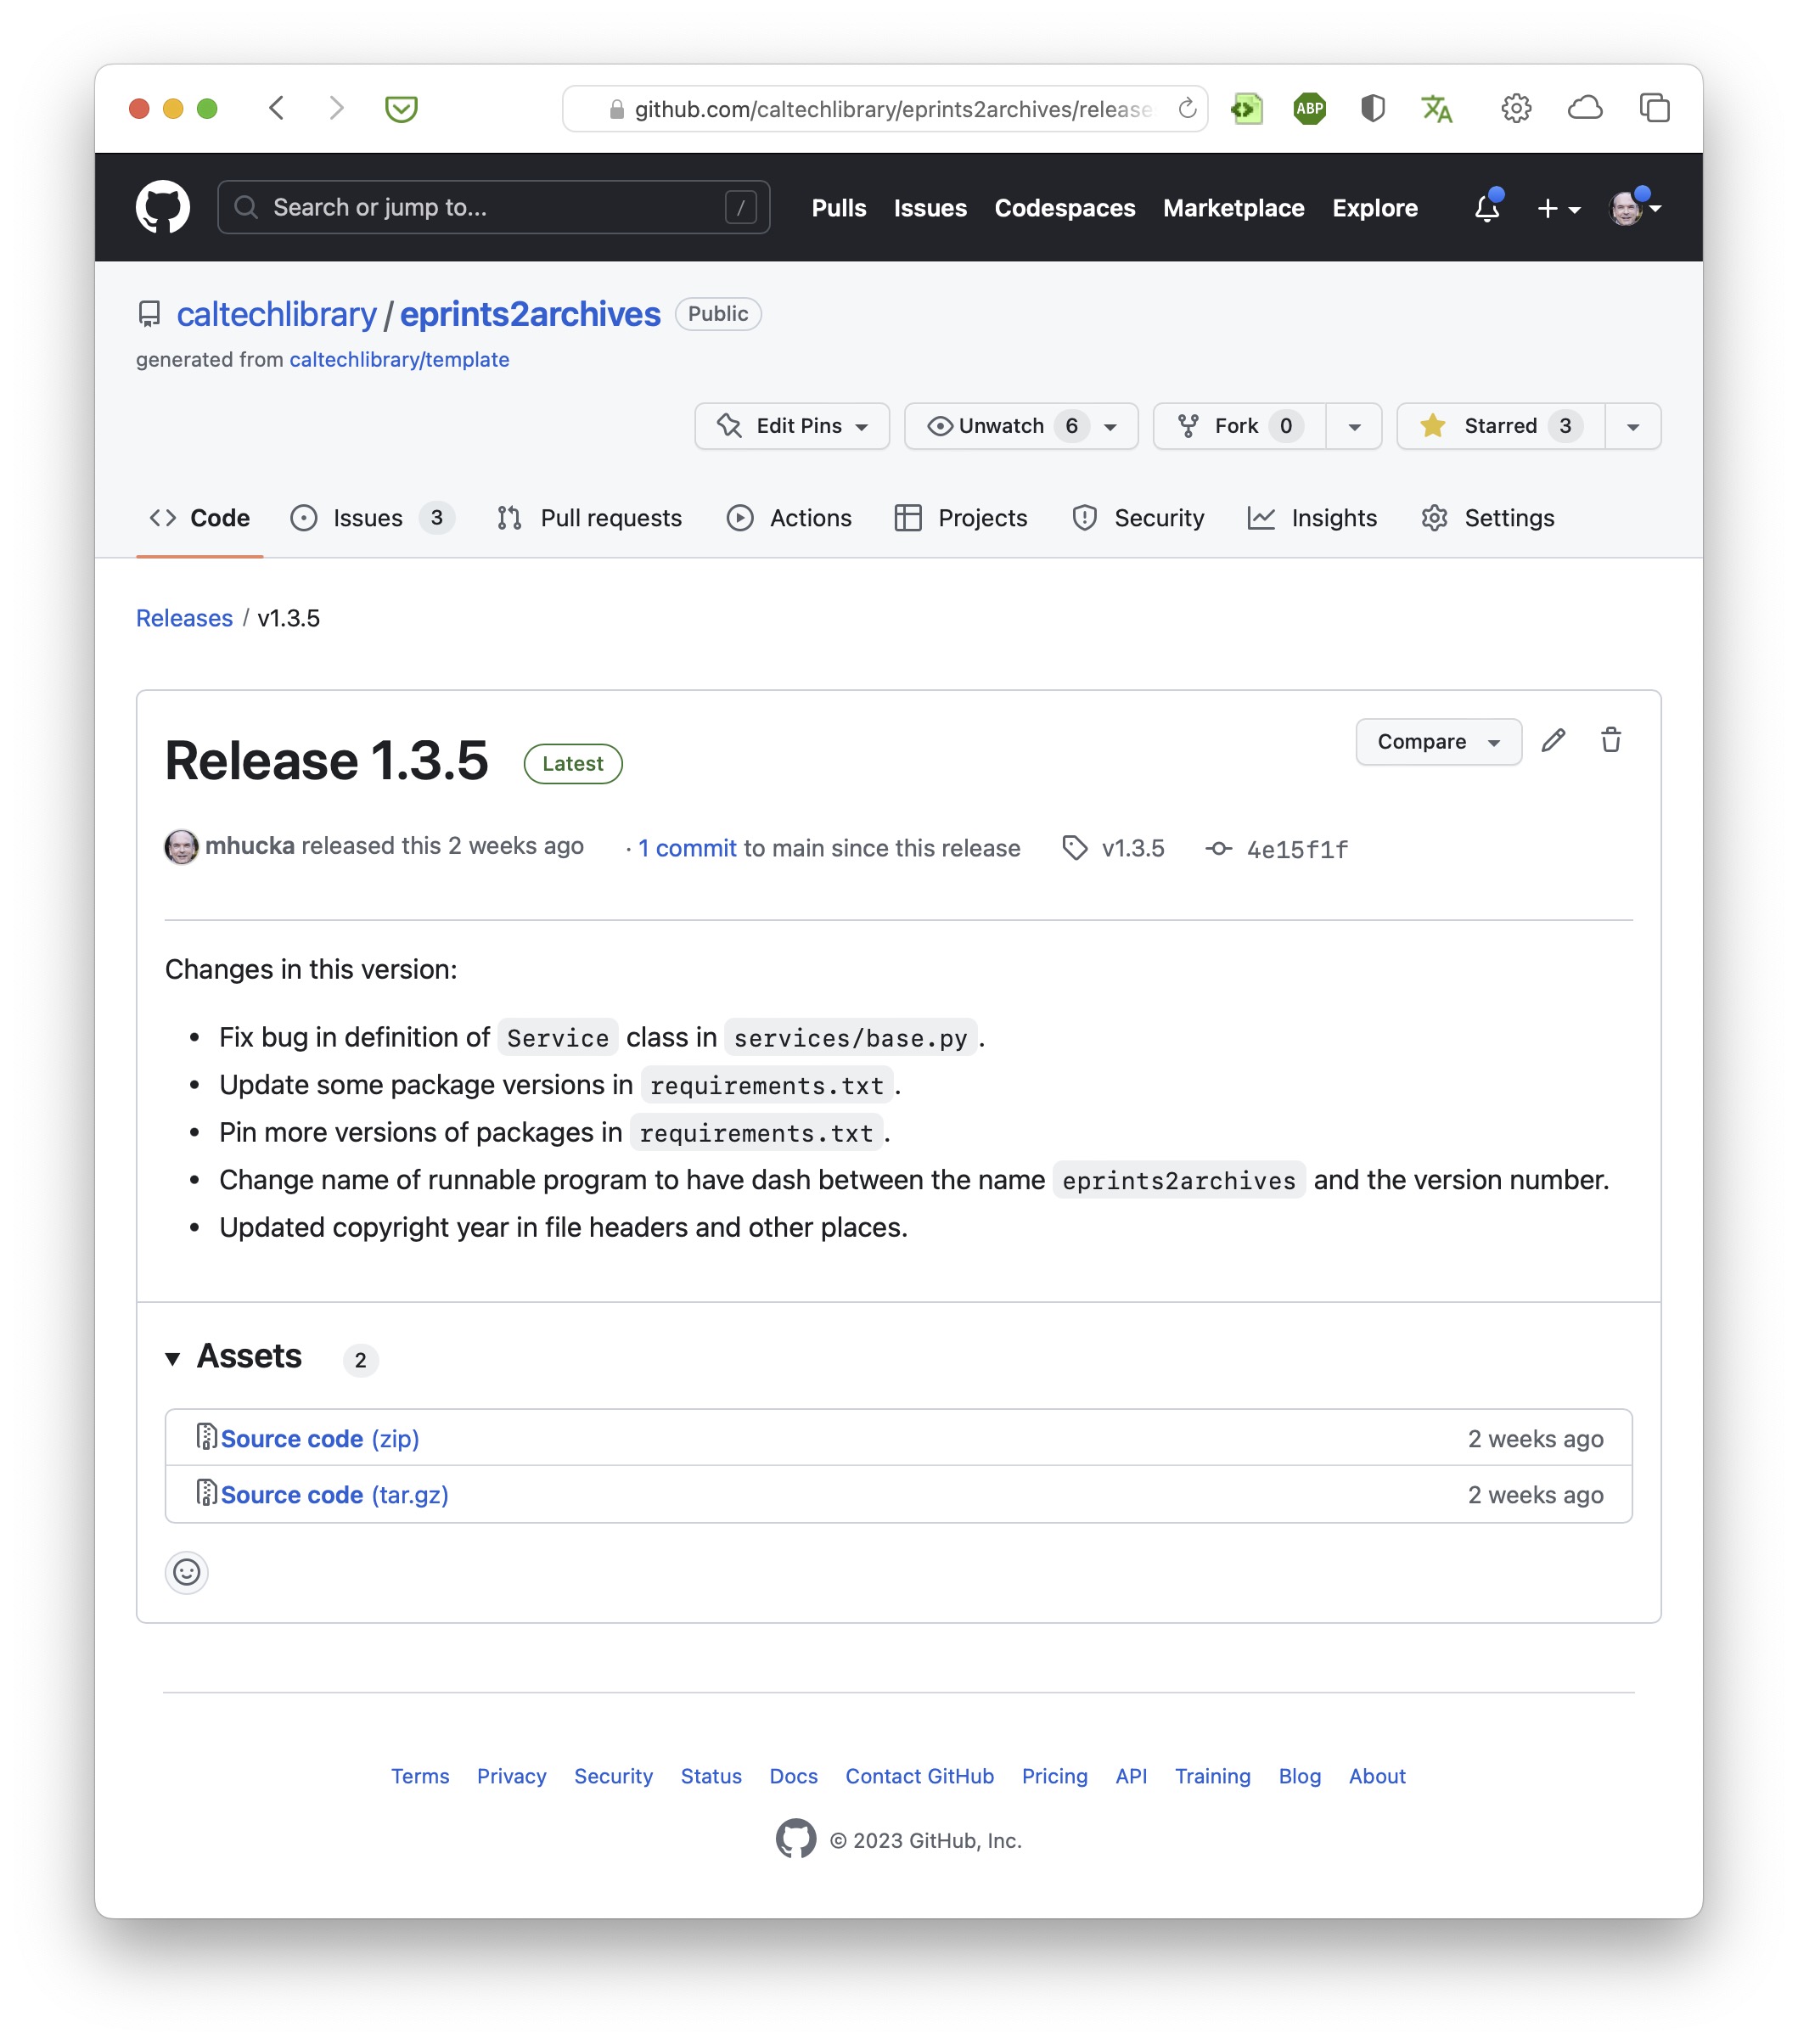
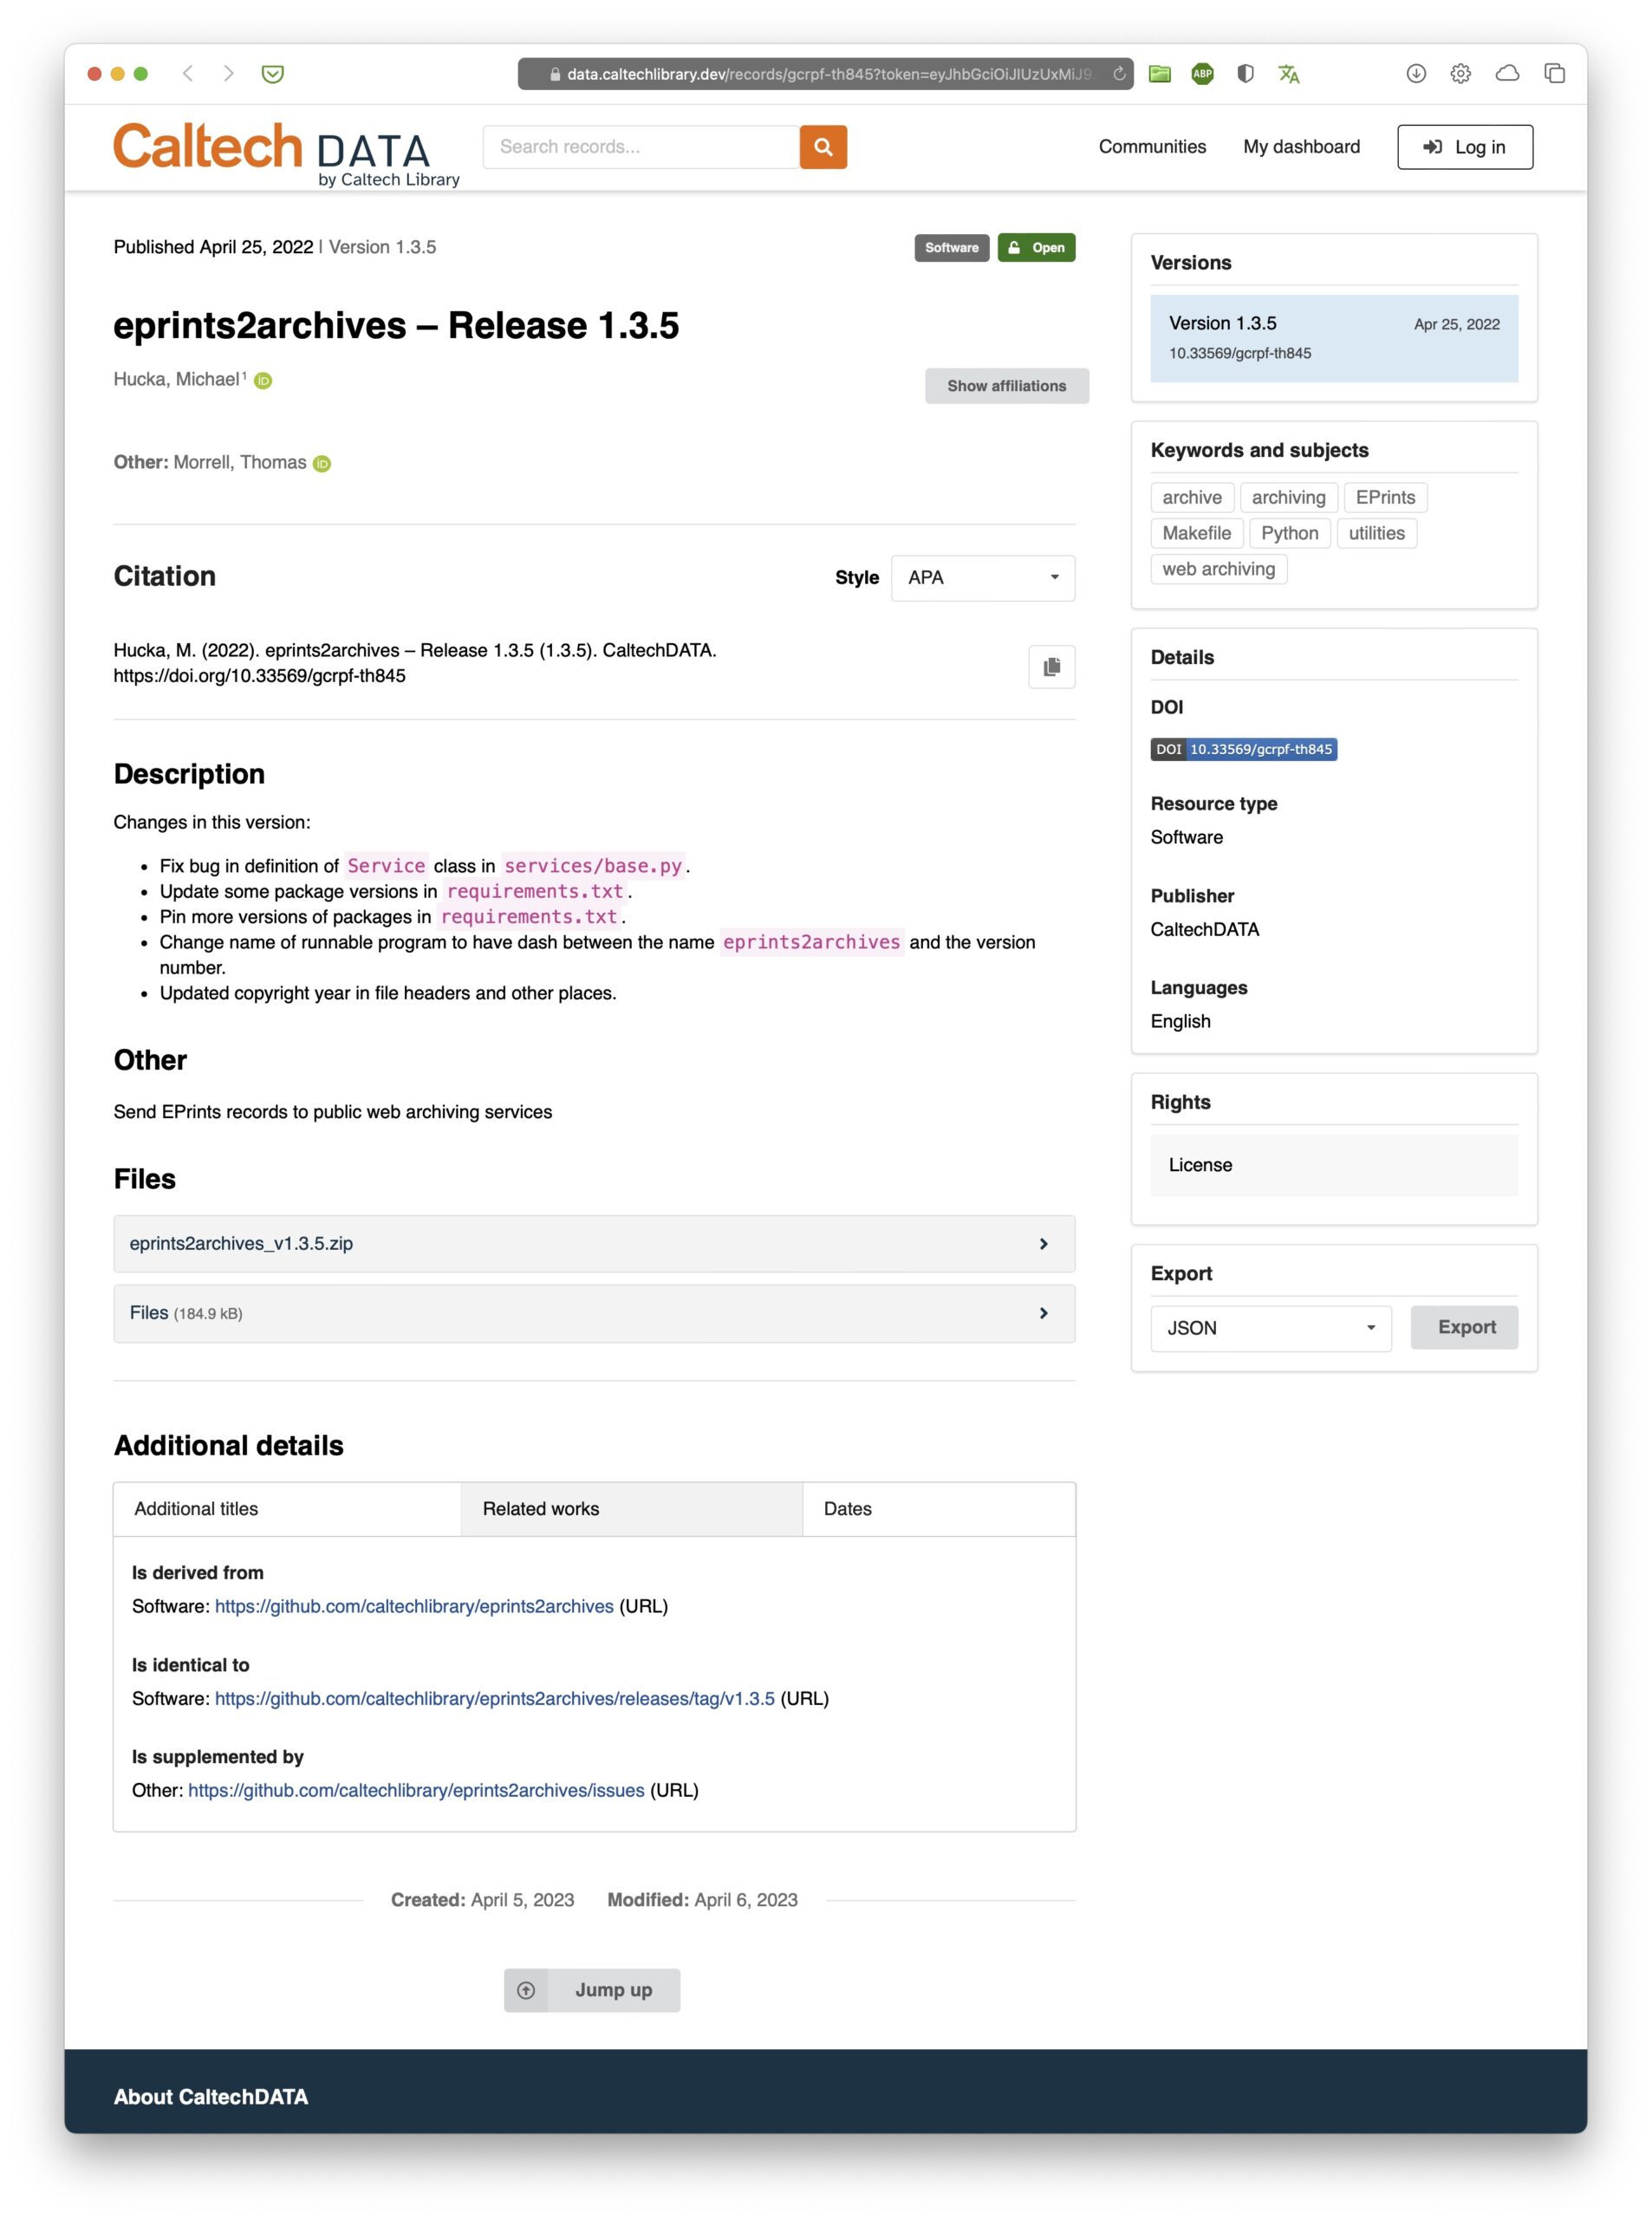
IGA is the InvenioRDM GitHub Archiver, a standalone program as well as a GitHub Actions workflow that lets you automatically archive GitHub software releases in an InvenioRDM repository.
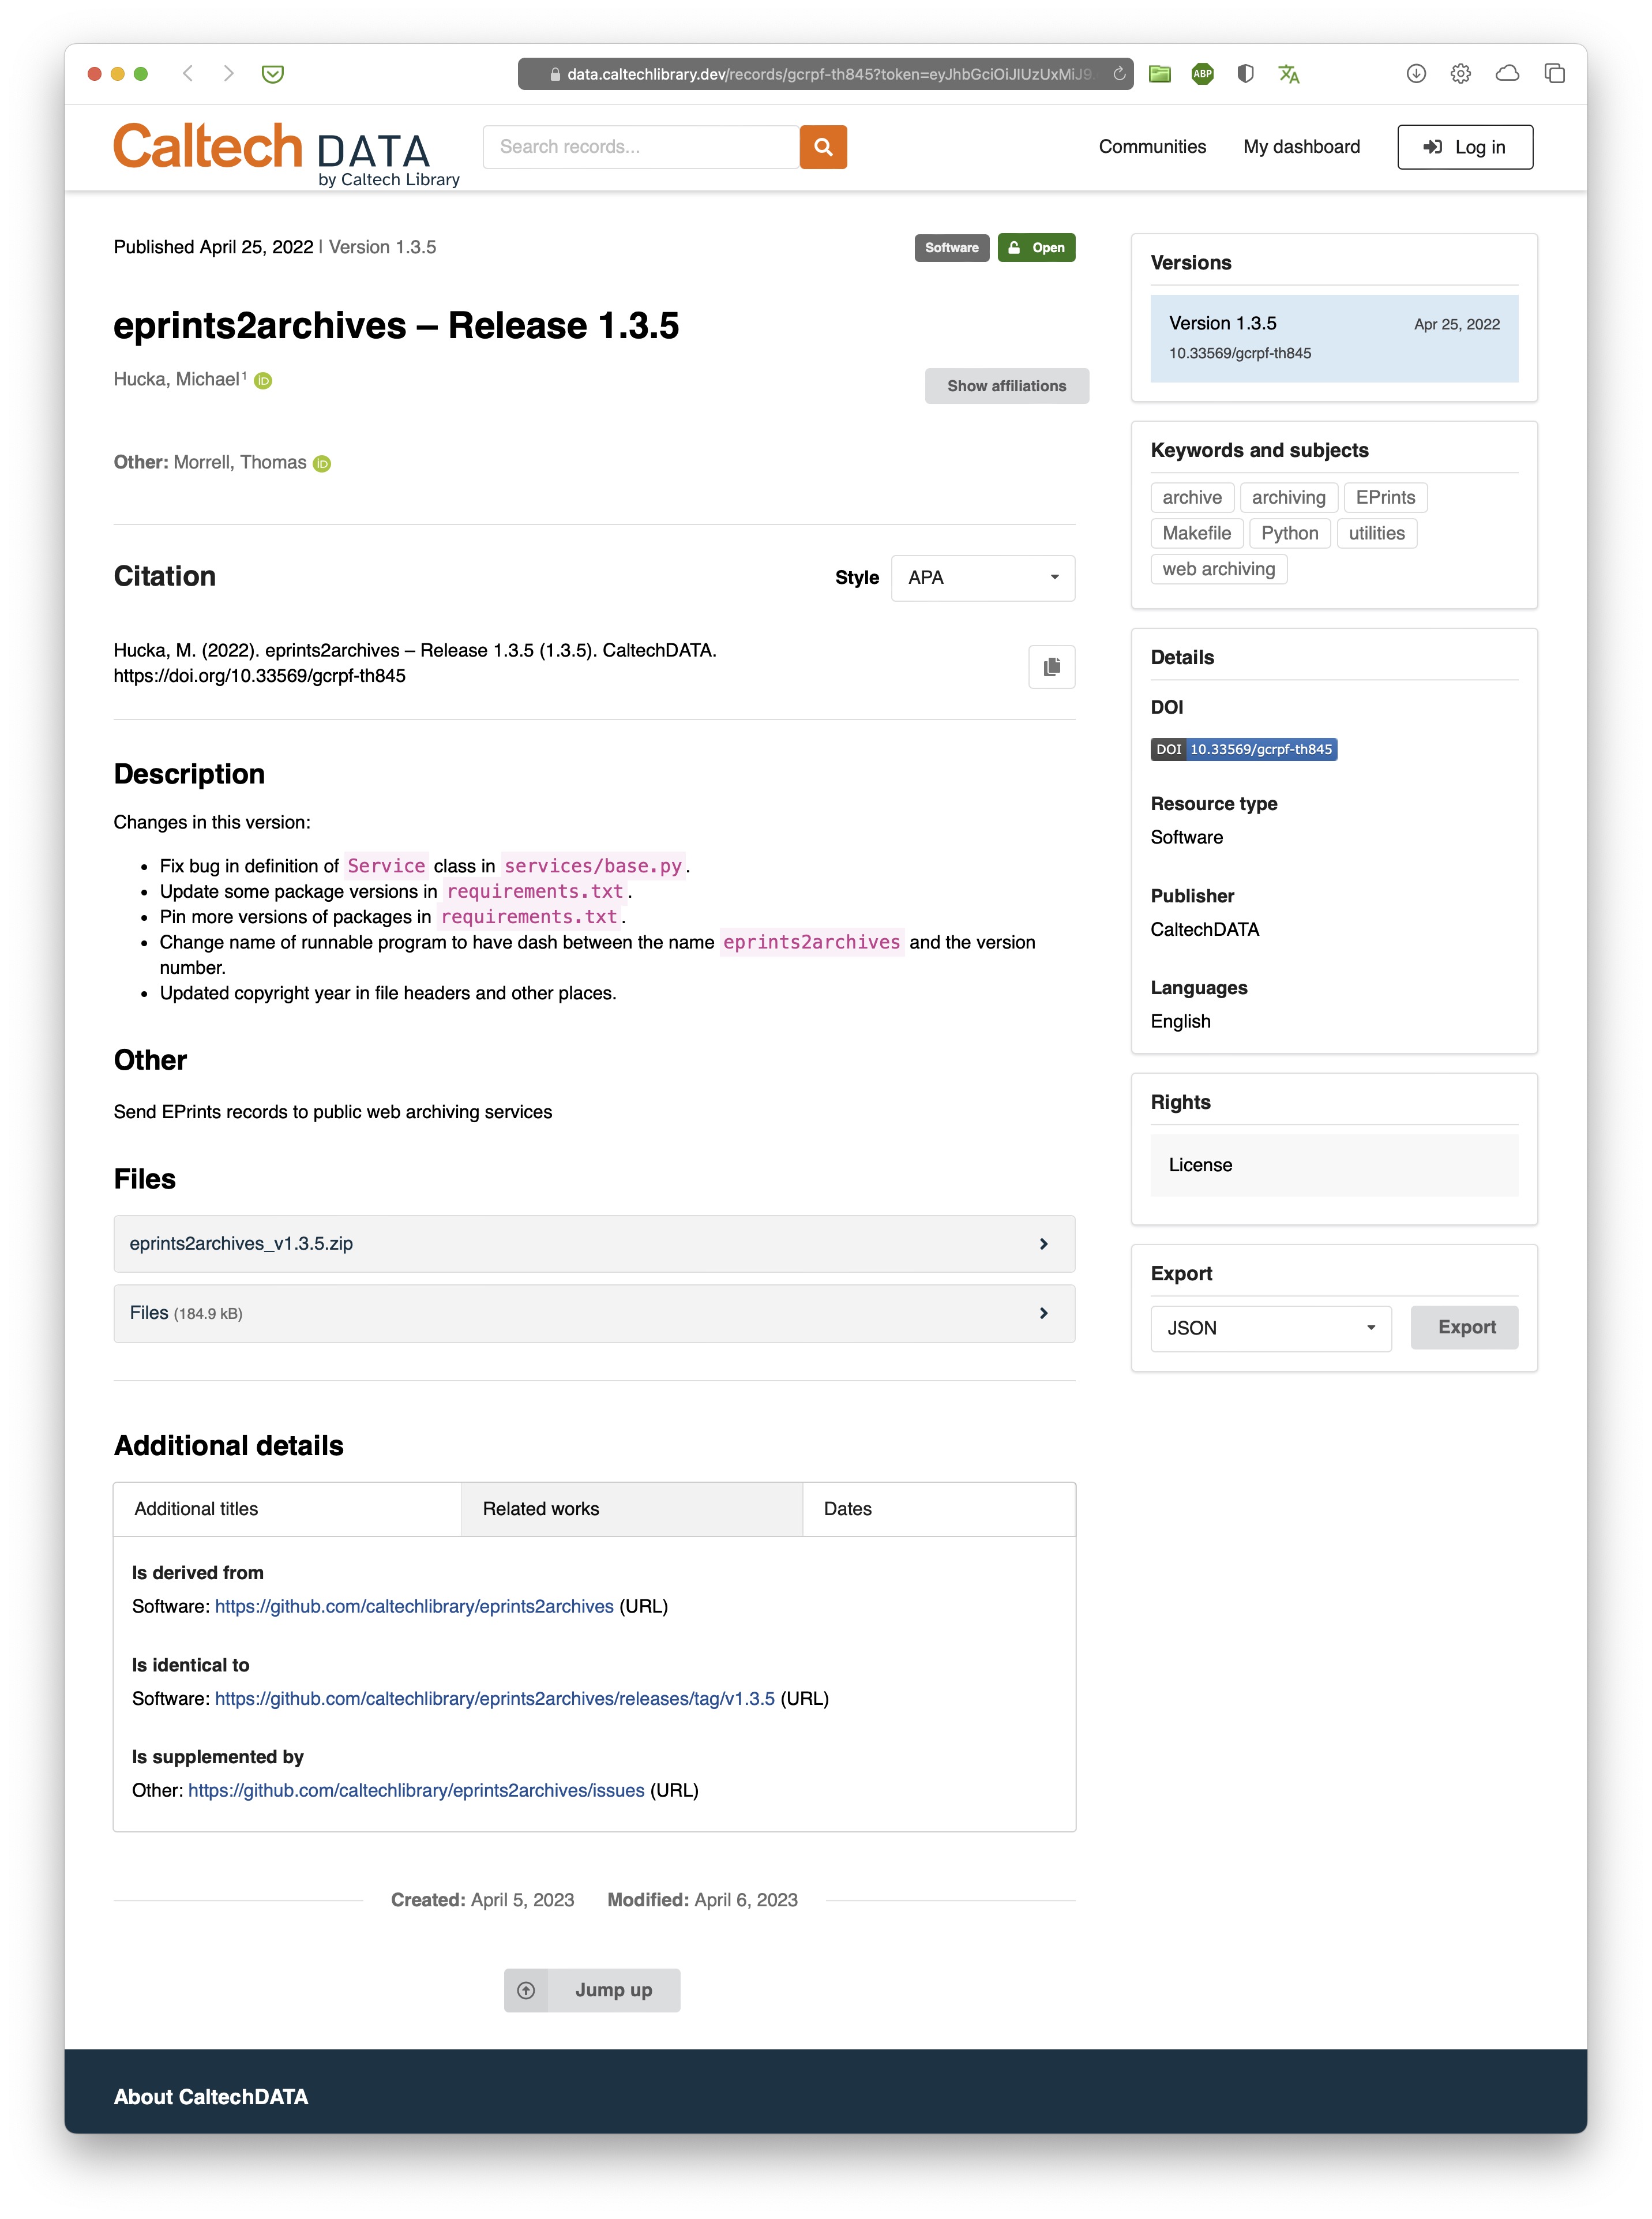
InvenioRDM is the basis for many institutional repositories such as CaltechDATA that enable users to preserve software and data sets in long-term archive. Though such repositories are critical resources, creating detailed records and uploading assets can be a tedious and error-prone process if done manually. This is where the InvenioRDM GitHub Archiver (IGA) comes in.
IGA creates metadata records and sends releases from GitHub to an InvenioRDM-based repository server. IGA can be invoked from the command line; it also can be set up as a GitHub Actions workflow to archive GitHub releases automatically for a repository each time they are made.
Support for overriding the record that IGA creates, for complete control if you need it
Support for using the GitHub API without a GitHub access token in simple cases
Extensive use of logging so you can see what’s going on under the hood
The IGA GitHub action workflow automatically will add the archived DOI to a CodeMeta file and create/update a CFF file using the CodeMeta2CFF workflow.
Installation
IGA can be installed as either (or both) a command-line program on your computer or a GitHub Action in a GitHub repository.
IGA as a standalone program
Please choose an approach that suits your situation and preferences.
Alternative 1: using pipx
Pipx lets you install Python programs in a way that isolates Python dependencies from other Python programs on your system, and yet the resulting iga command can be run from any shell and directory – like any normal program on your computer. If you use pipx on your system, you can install IGA with the following command:
pipx install iga
After installation, a program named iga should end up in a location where other command-line programs are installed on your computer. Test it by running the following command in a shell:
If you already installed IGA once before, and want to update to the latest version, add --upgrade to the end of either command line above.
After installation, a program named iga should end up in a location where other command-line programs are installed on your computer. Test it by running the following command in a shell:
iga --help
Alternative 3: from sources
If you prefer to install IGA directly from the source code, first obtain a copy by either downloading the source archive from the IGA releases page on GitHub, or by using git to clone the repository to a location on your computer. For example,
git clone https://github.com/caltechlibrary/iga
Next, after getting a copy of the files, run setup.py inside the code directory:
A GitHub Actions workflow is an automated process that runs on GitHub’s servers under control of a file in your repository. Follow these steps to create the IGA workflow file:
In the main branch of your GitHub repository, create a .github/workflows directory
In the .github/workflows directory, create a file named (e.g.) iga.yml and copy the following contents into it:
# GitHub Actions workflow for InvenioRDM GitHub Archiver version 1.3.4# This is available as the file "sample-workflow.yml" from the open-# source repository for IGA at https://github.com/caltechlibrary/iga/.# ╭────────────────────────────────────────────╮# │ Configure this section │# ╰────────────────────────────────────────────╯env:
# 👋🏻 Set the next variable to your InvenioRDM server address 👋🏻INVENIO_SERVER: https://your-invenio-server.org# Set to an InvenioRDM record ID to mark release as a new version.parent_record: none# The variables below are other IGA options. Please see the docs.community: nonedraft: falseall_assets: falseall_metadata: falsedebug: false# This variable is a setting for post-archiving CodeMeta file updates.# If you don't have a CodeMeta file, you can remove the add_doi_codemeta# and Codemeta2CFF jobs at the bottom of this file.ref: main# ╭────────────────────────────────────────────╮# │ The rest of this file should be left as-is │# ╰────────────────────────────────────────────╯name: InvenioRDM GitHub Archiveron:
release:
types: [published]workflow_dispatch:
inputs:
release_tag:
description: The release tag (empty = latest)parent_record:
description: ID of parent record (for versioning)community:
description: Name of InvenioRDM community (if any)draft:
description: Mark the record as a drafttype: booleanall_assets:
description: Attach all GitHub assetstype: booleanall_metadata:
description: Include additional GitHub metadatatype: booleandebug:
description: Print debug info in the GitHub logtype: booleanrun-name: Archive ${{inputs.release_tag || 'latest release'}} in InvenioRDMjobs:
run_iga:
name: Send to ${{needs.get_repository.outputs.server}}runs-on: ubuntu-latestneeds: get_repositoryoutputs:
record_doi: ${{steps.iga.outputs.record_doi}}steps:
- uses: caltechlibrary/iga@v1id: igawith:
INVENIO_SERVER: ${{env.INVENIO_SERVER}}INVENIO_TOKEN: ${{secrets.INVENIO_TOKEN}}all_assets: ${{github.event.inputs.all_assets || env.all_assets}}all_metadata: ${{github.event.inputs.all_metadata || env.all_metadata}}debug: ${{github.event.inputs.debug || env.debug}}draft: ${{github.event.inputs.draft || env.draft}}community: ${{github.event.inputs.community || env.community}}parent_record: ${{github.event.inputs.parent_record || env.parent_record}}release_tag: ${{github.event.inputs.release_tag || 'latest'}}get_repository:
name: Get repository nameruns-on: ubuntu-latestoutputs:
server: ${{steps.parse.outputs.host}}steps:
- name: Extract name from INVENIO_SERVERid: parserun: echo "host=$(cut -d"https://github.com/" -f3 <<< ${{env.INVENIO_SERVER}} | cut -d':' -f1)" >> $GITHUB_OUTPUTadd_doi_codemeta:
name: "Add ${{needs.run_iga.outputs.record_doi}} to codemeta.json"needs: run_igaruns-on: ubuntu-lateststeps:
- name: Checkoutuses: actions/checkout@v4with:
ref: ${{ env.ref }}
- name: Install sderun: pip install sde
- name: Add DOI to CodeMeta Filerun: sde identifier ${{needs.run_iga.outputs.record_doi}} codemeta.json
- name: Commit CFFuses: EndBug/add-and-commit@v9with:
message: 'Add DOI to codemeta.json file'add: 'codemeta.json'CodeMeta2CFF:
runs-on: ubuntu-latestneeds: add_doi_codemetasteps:
- name: Checkoutuses: actions/checkout@v4with:
ref: ${{ env.ref }}
- name: Convert CFFuses: caltechlibrary/codemeta2cff@main
- name: Commit CFFuses: EndBug/add-and-commit@v9with:
message: 'Add updated CITATION.cff from codemeta.json file'add: 'CITATION.cff'
Edit the value of the INVENIO_SERVER variable (line 7 above) ↑
If you have a CodeMeta file, the GitHub action workflow can automatically add the DOI after IGA has run. The “ref” value is the branch where the CodeMeta file will be updated. If you don’t use a CodeMeta file, you can delete the add_doi_codemeta part of the workflow.
No matter whether IGA is run locally on your computer or as a GitHub Actions workflow, in both cases it must be provided with a personal access token (PAT) for your InvenioRDM server. Getting one is the first step.
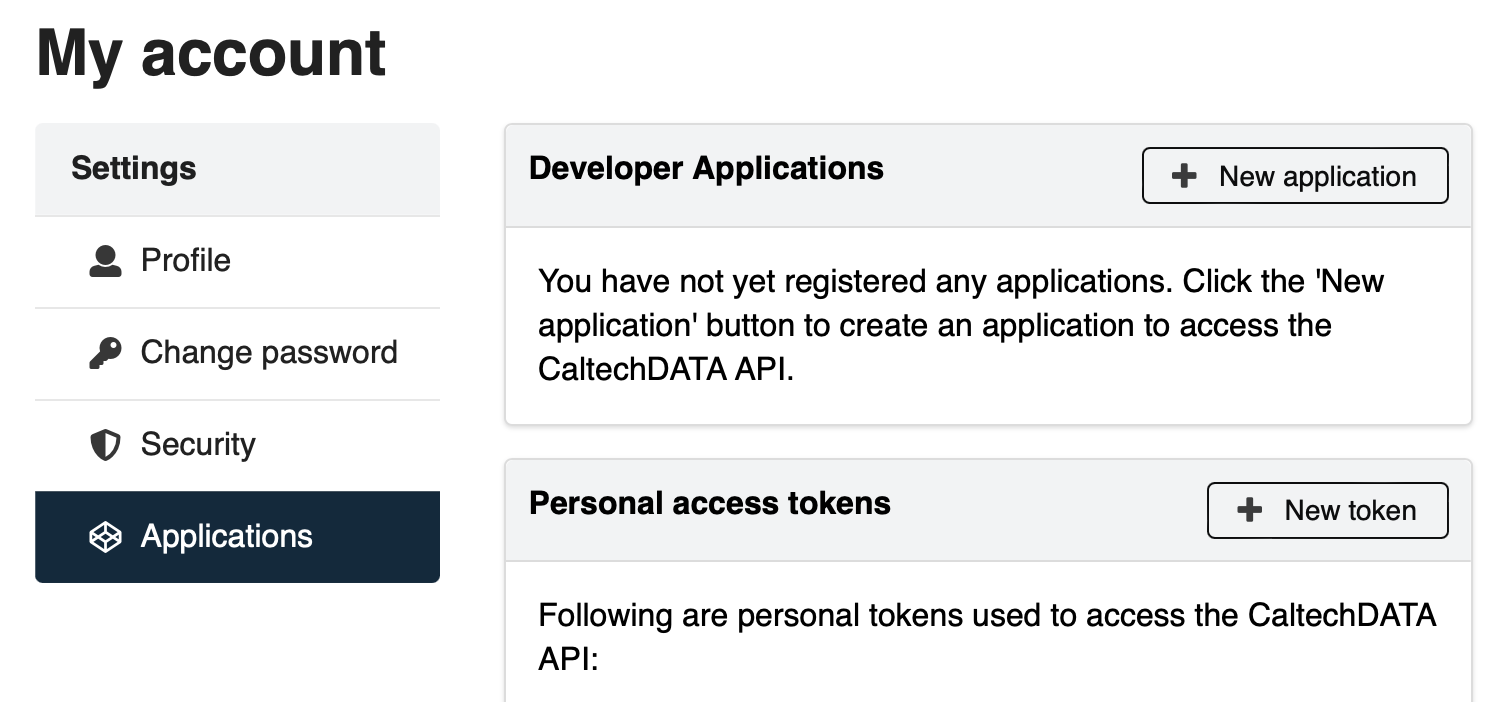
Getting an InvenioRDM token
Log in to your InvenioRDM account
Go to the Applications page in your account profile
Click the New token button next to “Personal access tokens”
On the page that is shown after you click that button, name your token (the name does not matter) and click the Create button
After InvenioRDM creates and shows you the token, copy it to a safe location because InvenioRDM will not show it again
Configuring and running IGA locally
To send a GitHub release to your InvenioRDM server, IGA needs this information:
(Required) The identity of the GitHub release to be archived
(Required) The address of the destination InvenioRDM server
(Required) A personal access token for InvenioRDM (from above)
The identity of the GitHub release is always given as an argument to IGA on the command line; the remaining values can be provided either via command-line options or environment variables. One approach is to set environment variables in shell scripts or your interactive shell. Here is an example using Bash shell syntax, with fake token values:
Once these are set, use of IGA can be as simple as providing a URL for a release in GitHub. For example, the following command creates a draft record (the -d option is short for --draft) for another project in GitHub and tells IGA to open (the -o option is short for --open) the newly-created InvenioRDM entry in a web browser:
iga -d -o https://github.com/mhucka/taupe/releases/tag/v1.2.0
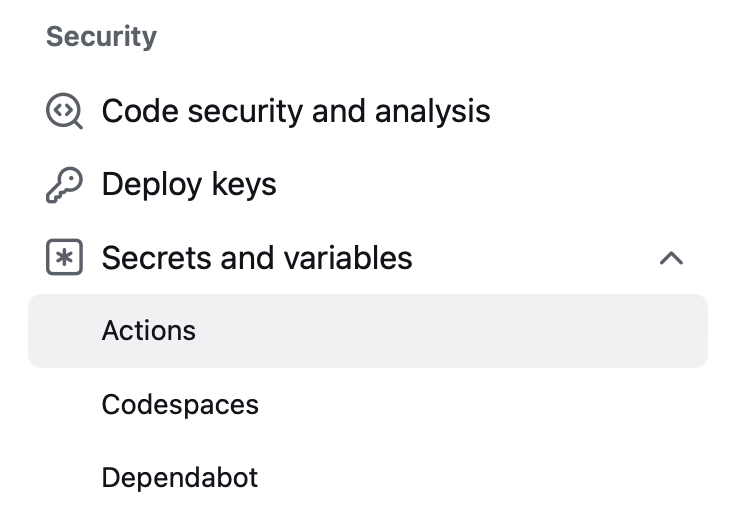
In the left-hand sidebar, find Secrets and variables in the Security section, click on it to reveal Actions underneath, then click on Actions
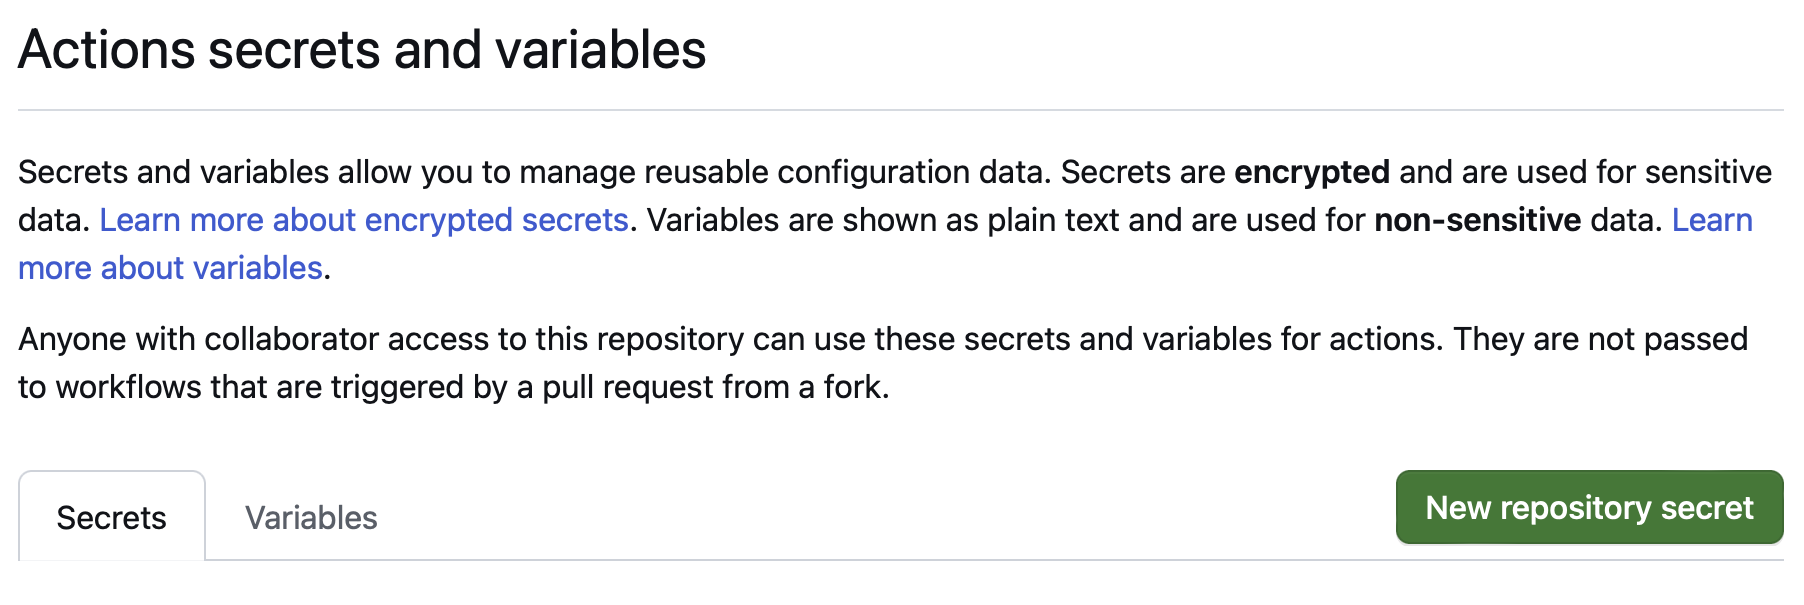
In the next page, click the green New repository secret button
Name the variable INVENIO_TOKEN and paste in your InvenioRDM token
Finish by clicking the green Add secret button
Testing the workflow
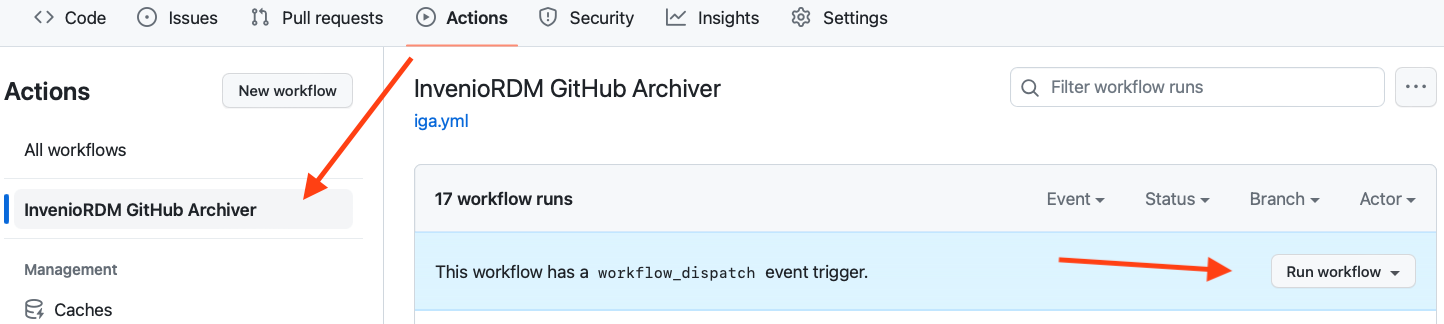
After setting up the workflow and storing the InvenioRDM token in your repository on GitHub, it’s a good idea to run the workflow manually to test that it works as expected.
Go to the Actions tab in your repository and click on the name of the workflow in the sidebar on the left
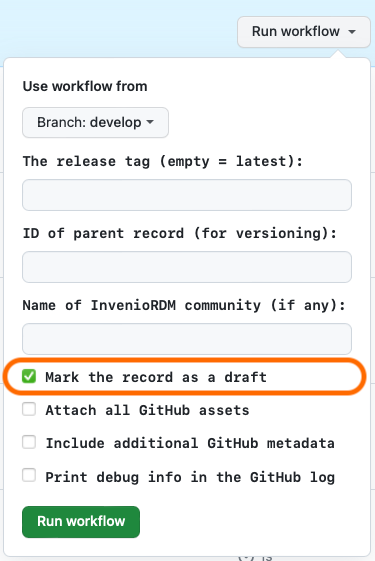
Click the Run workflow button in the right-hand side of the blue strip
In the pull-down, change the value of “Mark the record as a draft” to true
Click the green Run workflow button near the bottom
Refresh the web page and a new line will be shown named after your workflow file
Click the title of the workflow to see the IGA workflow progress and results
Running the workflow when releasing software
Once the personal access token from InvenioRDM is stored as a GitHub secret, the workflow should run automatically every time a new release is made on GitHub – no further action should be needed. You can check the results (and look for errors if something went wrong) by going to the Actions tab in your GitHub repository.
Usage
This section provides detailed information about IGA’s operation and options to control it.
Identifying the InvenioRDM server
The server address must be provided either as the value of the option --invenio-server or in an environment variable named INVENIO_SERVER. If the server address does not begin with https://, IGA will prepend it automatically.
Providing an InvenioRDM access token
A personal access token (PAT) for making API calls to the InvenioRDM server must be also supplied when invoking IGA. The preferred method is to set the value of the environment variable INVENIO_TOKEN. Alternatively, you can use the option --invenio-token to pass the token on the command line, but you are strongly advised to avoid this practice because it is insecure.
To obtain a PAT from an InvenioRDM server, first log in to the server, then visit the page at /account/settings/applications and use the interface there to create a token. The token will be a long string of alphanumeric characters such as OH0KYf4PGYQGnCM4b53ejSGicOC4s4YnonRVzGJbWxY; set the value of the variable INVENIO_TOKEN to this string.
Providing a GitHub access token
It may be possible to run IGA without providing a GitHub access token. GitHub allows up to 60 API calls per minute when running without credentials, and though IGA makes several API calls to GitHub each time it runs, for some public repositories IGA will not hit the limit. However, if you are archiving a private repository, run IGA multiple times in a row, or the repository has many contributors, then you will need to supply a GitHub access token. The preferred way of doing that is to set the value of the environment variable GITHUB_TOKEN. Alternatively, you can use the option --github-token to pass the token on the command line, but you are strongly advised to avoid this practice because it is insecure. To obtain a PAT from GitHub, visit https://docs.github.com/en/authentication and follow the instructions for creating a “classic” personal access token.
Note that when you run IGA as a GitHub Actions workflow, you do not need to create or set a GitHub token because it is obtained automatically by the GitHub Actions workflow.
Specifying a GitHub release
A GitHub release can be specified to IGA in one of two mutually-exclusive ways:
The full URL of the web page on GitHub of a tagged release. In this case,
the URL must be the final argument on the command line invocation of IGA
and the options --account and --repo must be omitted.
A combination of account name, repository name, and tag. In this
case, the final argument on the command line must be the tag, and in
addition, values for the options --account and --repo must be provided.
Here’s an example using approach #1 (assuming environment variables INVENIO_SERVER, INVENIO_TOKEN, and GITHUB_TOKEN have all been set):
iga https://github.com/mhucka/taupe/releases/tag/v1.2.0
and here’s the equivalent using approach #2:
iga --github-account mhucka --github-repo taupe v1.2.0
Note that when using this form of the command, the release tag (v1.2.0 above) must be the last item given on the command line.
Gathering metadata for an InvenioRDM record
The record created in InvenioRDM is constructed using information obtained using GitHub’s API as well as several other APIs as needed. The information includes the following:
(if one exists) a codemeta.json file in the GitHub repository
(if one exists) a CITATION.cff file in the GitHub repository
data available from GitHub for the release
data available from GitHub for the repository
data available from GitHub for the account of the owner
data available from GitHub for the accounts of repository contributors
file assets associated with the GitHub release
data available from ORCID.org for ORCID identifiers
data available from ROR.org for Research Organization Registry identifiers
data available from DOI.org, NCBI, Google Books, & others for publications
data available from spdx.org for software licenses
IGA tries to use CodeMeta.json first and CITATION.cff second to fill out the fields of the InvenioRDM record. If neither of those files are present, IGA uses values from the GitHub repository instead. You can make it always use all sources of info with the option --all-metadata. Depending on how complete and up-to-date your CodeMeta.json and CITATION.cff are, this may or may not make the record more comprehensive and may or may not introduce redundancies or unwanted values.
To override the auto-created metadata, use the option --read-metadata followed by the path to a JSON file structured according to the InvenioRDM schema used by the destination server. When --read-metadata is provided, IGA does not extract the data above, but still obtains the file assets from GitHub.
Specifying GitHub file assets
By default, IGA attaches to the InvenioRDM record only the ZIP file asset created by GitHub for the release. To make IGA attach all assets associated with the GitHub release, use the option --all-assets.
To upload specific file assets and override the default selections made by IGA, you can use the option --file followed by a path to a file to be uploaded. You can repeat the option --file to upload multiple file assets. Note that if --file is provided, then IGA does not use any file assets from GitHub; it is the user’s responsibility to supply all the files that should be uploaded.
If both --read-metadata and --file are used, then IGA does not actually contact GitHub for any information.
Handling communities
To submit your record to a community, use the --community option together with a community name. The option --list-communities can be used to get a list of communities supported by the InvenioRDM server. Note that submitting a record to a community means that the record will not be finalized and will not be publicly visible when IGA finishes; instead, the record URL that you receive will be for a draft version, pending review by the community moderators.
Indicating draft versus published records
If the --community option is not used, then by default, IGA will finalize and publish the record. To make it stop short and leave the record as a draft instead, use the option --draft. The draft option also takes precedence over the community option: if you use both --draft and --community, IGA will stop after creating the draft record and will not submit it to the community. (You can nevertheless submit the record to a community manually once the draft is created, by visiting the record’s web page and using the InvenioRDM interface there.)
Versioning records
The option --parent-record can be used to indicate that the record being constructed is a new version of an existing record. This will make IGA use the InvenioRDM API for record versioning. The newly-created record will be linked to a parent record identified by the value passed to --parent-record. The value must be either an InvenioRDM record identifier (which is a sequence of alphanumeric characters of the form XXXXX-XXXXX, such as bknz4-bch35, generated by the InvenioRDM server), or a URL to the landing page of the record in the InvenioRDM server. (Note that such URLs end in the record identifier.) Here is an example of using this option:
iga --parent-record xbcd4-efgh5 https://github.com/mhucka/taupe/releases/tag/v1.2.0
Other options recognized by IGA
Running IGA with the option --save-metadata will make it create a metadata record, but instead of uploading the record (and any assets) to the InvenioRDM server, IGA will write the result to the given destination. This can be useful not only for debugging but also for creating a starting point for a custom metadata record: first run IGA with --save-metadata to save a record to a file, edit the result, then finally run IGA with the --read-metadata option to use the modified record to create a release in the InvenioRDM server.
The --mode option can be used to change the run mode. Four run modes are available: quiet, normal, verbose, and debug. The default mode is normal, in which IGA prints a few messages while it’s working. The mode quiet will make it avoid printing anything unless an error occurs, the mode verbose will make it print a detailed trace of what it is doing, and the mode debug will make IGA even more verbose. In addition, in debug mode, IGA will drop into the pdb debugger if it encounters an exception during execution. On Linux and macOS, debug mode also installs a signal handler on signal USR1 that causes IGA to drop into the pdb debugger if the signal USR1 is received. (Use kill -USR1 NNN, where NNN is the IGA process id.)
By default, informational output is sent to the standard output (normally the terminal console). The option --log-dest can be used to send the output to the given destination instead. The value can be - (i.e., a dash) to indicate console output, or it can be a file path to send the output to the file. A special exception is that even if a log destination is given, IGA will still print the final record URL to stdout. This makes it possible to invoke IGA from scripts that capture the record URL while still saving diagnostic output in case debugging is needed.
By default, IGA prints only the record URL when done. The option --print-doi will make it also print the DOI of the record. (Note that this only works when publishing records; if options --draft or --community are used, then there will be no DOI. In those case, only the URL will be printed.)
Reading and writing large files may take a long time; on the other hand, IGA should not wait forever on network operations before reporting an error if a server or network becomes unresponsive. To balance these conflicting needs, IGA automatically scales its network timeout based on file sizes. To override its adaptive algorithm and set an explicit timeout value, use the option --timeout with a value in seconds.
If given the --version option, this program will print its version and other information, and exit without doing anything else.
Running IGA with the option --help will make it print help text and exit without doing anything else.
Summary of command-line options
As explain above, IGA takes one required argument on the command line: either (1) the full URL of a web page on GitHub of a tagged release, or (2) a release tag name which is to be used in combination with options --github-account and --github-repo. The following table summarizes all the command line options available.
Long form option
Short
Meaning
Default
--all-assets
-A
Attach all GitHub assets
Attach only the release source ZIP
--all-metadata
-M
Include additional metadata from GitHub
Favor CodeMeta & CFF
--communityC
-cC
Submit record to RDM community C
Don’t submit record to any community
--draft
-d
Mark the RDM record as a draft
Publish record when done
--fileF
-fF
Upload local file F instead of GitHub assets
Upload only GitHub assets
⚑
--github-accountA
-aA
Look in GitHub account A
Get account name from release URL
✯
--github-repoR
-rR
Look in GitHub repository R of account A
Get repo name from release URL
✯
--github-tokenT
-tT
Use GitHub access token T
Use value in env. var. GITHUB_TOKEN
--help
-h
Print help info and exit
--invenio-serverS
-sS
Send record to InvenioRDM server at address S
Use value in env. var. INVENIO_SERVER
--invenio-tokenK
-kK
Use InvenioRDM access token K
Use value in env. var. INVENIO_TOKEN
--list-communities
-L
List communities available for use with --community
--log-destL
-lL
Write log output to destination L
Write to terminal
⚐
--modeM
-mM
Run in mode quiet, normal, verbose, or debug
normal
--open
-o
Open record’s web page in a browser when done
Do nothing when done
--parent-recordN
-pN
Make this a new version of existing record N
New record is unrelated to other records
❖
--print-doi
-i
Print both the DOI & record URL when done
Print only the record URL
--read-metadataR
-RR
Read metadata record from file R; don’t build one
Build metadata record
--save-metadataD
-SD
Save metadata record to file D; don’t upload it
Upload to InvenioRDM server
--timeoutX
-TX
Wait on network operations a max of X seconds
Auto-adjusted based on file size
--version
-V
Print program version info and exit
⚑ Can repeat the option to specify multiple files.
⚐ To write to the console, use the character - as the value of OUT; otherwise, OUT must be the name of a file where the output should be written.
✯ When using --github-account and --github-repo, the last argument on the command line must be a release tag name.
❖ The record identifier must be given either as a sequence of alphanumeric characters of the form XXXXX-XXXXX (e.g., bknz4-bch35), or as a URL to the landing page of an existing record in the InvenioRDM server.
Return values
This program exits with a return status code of 0 if no problem is encountered. Otherwise, it returns a nonzero status code. The following table lists the possible values:
Code
Meaning
0
success – program completed normally
1
interrupted
2
encountered a bad or missing value for an option
3
encountered a problem with a file or directory
4
encountered a problem interacting with GitHub
5
encountered a problem interacting with InvenioRDM
6
the personal access token was rejected
7
an exception or fatal error occurred
Adding a DOI badge to your GitHub repository
Once you have set up the IGA workflow in your GitHub repository, you may wish to add a DOI badge to your repository’s README file. It would be a chore to keep updating the DOI value in this badge every time a new release is made, and thankfully, it’s not necessary: it’s possible to make the badge get the current DOI value dynamically. Here is how:
After you have at least one release archived in your InvenioRDM server, find out the DOI of that release in InvenioRDM, and extract the tail end of that DOI. The DOI assigned by InvenioRDM will be a string such as 10.22002/zsmem-2pg20; the tail end is the zsmem-2pg20 part. (Your DOI and tail portion will be different.)
Let SERVERURL stand for the URL for your InvenioRDM server, and let IDENTIFIER stand for the identifier portion of the DOI. In your README.md file, write the DOI badge as follows (without line breaks):
You can change the look of the badge by using style parameters. Please refer to the Shields.io documentation for static badges.
Known issues and limitations
The following are known issues and limitations.
As of mid-2023, InvenioRDM requires names of record creators and other contributors to be split into given (first) and family (surname). This is problematic for multiple reasons. The first is that mononyms are common in many countries: a person’s name may legitimately be only a single word which is not conceptually a “given” or “family” name. To compound the difficulty for IGA, names are stored as single fields in GitHub account metadata, so unless a repository has a codemeta.json or CITATION.cff file (which allow authors more control over how they want their names represented), IGA is forced to try to split the single GitHub name string into two parts. A foolproof algorithm for doing this does not exist, so IGA will sometimes get it wrong. (That said, IGA goes to extraordinary lengths to try to do a good job.)
InvenioRDM requires that identities (creators, contributors, etc.) to be labeled as personal or organizational. The nature of identities is usually made clear in codemeta.json and CITATION.cff files. GitHub also provides a flag that is meant to be used to label organizational accounts, but sometimes people don’t set the GitHub account information correctly. Consequently, if IGA has to use GitHub data to get (e.g.) the list of contributors on a project, it may mislabel identities in the InvenioRDM record it produces.
Some accounts on GitHub are software automation or “bot” accounts, but are not labeled as such. These accounts are generally indistinguishable from human accounts on GitHub, so if they’re not labeled as bot or organizational accounts in GitHub, IGA can’t recognize that they’re humans. If such an account is the creator of a release in GitHub, and IGA tries to use its name-splitting algorithm on the name of the account, it may produce a nonsensical result. For example, it might turn “Travis CI” into an entry with a first name of “Travis” and last name of “CI”.
Funder and funding information can only be specified in codemeta.json files; neither GitHub nor CITATION.cff have provisions to store this kind of metadata. The CodeMeta specification defines two fields for this purpose: funder and funding. Unfortunately, these map imperfectly to the requirements of InvenioRDM’s metadata format. In addition, people don’t always follow the CodeMeta guidelines, and sometimes they write funding information as text strings (instead of structured objects), the interpretation of which would require software that can recognize grant and funding agency information from free-text descriptions. This combination of factors means IGA often can’t fill in the funding metadata in InvenioRDM records even if there is some funding information in the codemeta.json file.
This work was funded by the California Institute of Technology Library.
IGA uses multiple other open-source packages, without which it would have taken much longer to write the software. I want to acknowledge this debt. In alphabetical order, the packages are:
Send a message from L2 Polygon zkEVM testnet to L1 Goerli.
Example
There’s two contracts; L2Contract.sol and L1Contract.sol
The L2 contract has a method sendGreetingMessageToL1 that sends a message form L2 to L1 contract to set a greeting message on L1 contract.
It sends the encoded calldata to execute setGreeting on L1 which can only be called if the message was sent by the L2 contract.
sent tx hash 0x0085f32974b2b847bacb829f9006d89248cc6e53e3fb86f45cc348d94542ca22
https://testnet-zkevm.polygonscan.com/tx/0x0085f32974b2b847bacb829f9006d89248cc6e53e3fb86f45cc348d94542ca22
Wait for L1 Root Inclusion
Command
L2_TX_HASH=0x0085f32974b2b847bacb829f9006d89248cc6e53e3fb86f45cc348d94542ca22 \
L1_CONTRACT=0xd7f8d5a683D51fF90Aff7C25430CA3abAe3F80A0 \
npx hardhat run --network polygonzkevm scripts/waitForInclusion.js
Output
Waiting for L1 root inclusion (this may take up to 60 minutes)...
{
  "leaf_type": 1,
  "orig_net": 1,
  "orig_addr": "0x8Da765bB3F8fbcae3647Fc326D1F7d3337a5882A",
  "amount": "0",
  "dest_net": 0,
  "dest_addr": "0xd7f8d5a683D51fF90Aff7C25430CA3abAe3F80A0",
  "block_num": "569430",
  "deposit_cnt": "23516",
  "network_id": 1,
  "tx_hash": "0x0085f32974b2b847bacb829f9006d89248cc6e53e3fb86f45cc348d94542ca22",
  "claim_tx_hash": "",
  "metadata": "0xa41368620000000000000000000000000000000000000000000000000000000000000020000000000000000000000000000000000000000000000000000000000000000b68656c6c6f20776f726c64000000000000000000000000000000000000000000",
  "ready_for_claim": true
}
Ready to finalize message
sent tx hash 0xcaae7ee9dd1f8657a21f4598a4c8a9e97cd1341ddf1ca988ad371641bc3993af
https://goerli.etherscan.io/tx/0xcaae7ee9dd1f8657a21f4598a4c8a9e97cd1341ddf1ca988ad371641bc3993af
Get Greeting on L1
Command
L1_CONTRACT=0xd7f8d5a683D51fF90Aff7C25430CA3abAe3F80A0 \
npx hardhat run --network goerli scripts/getGreetingOnL1.js


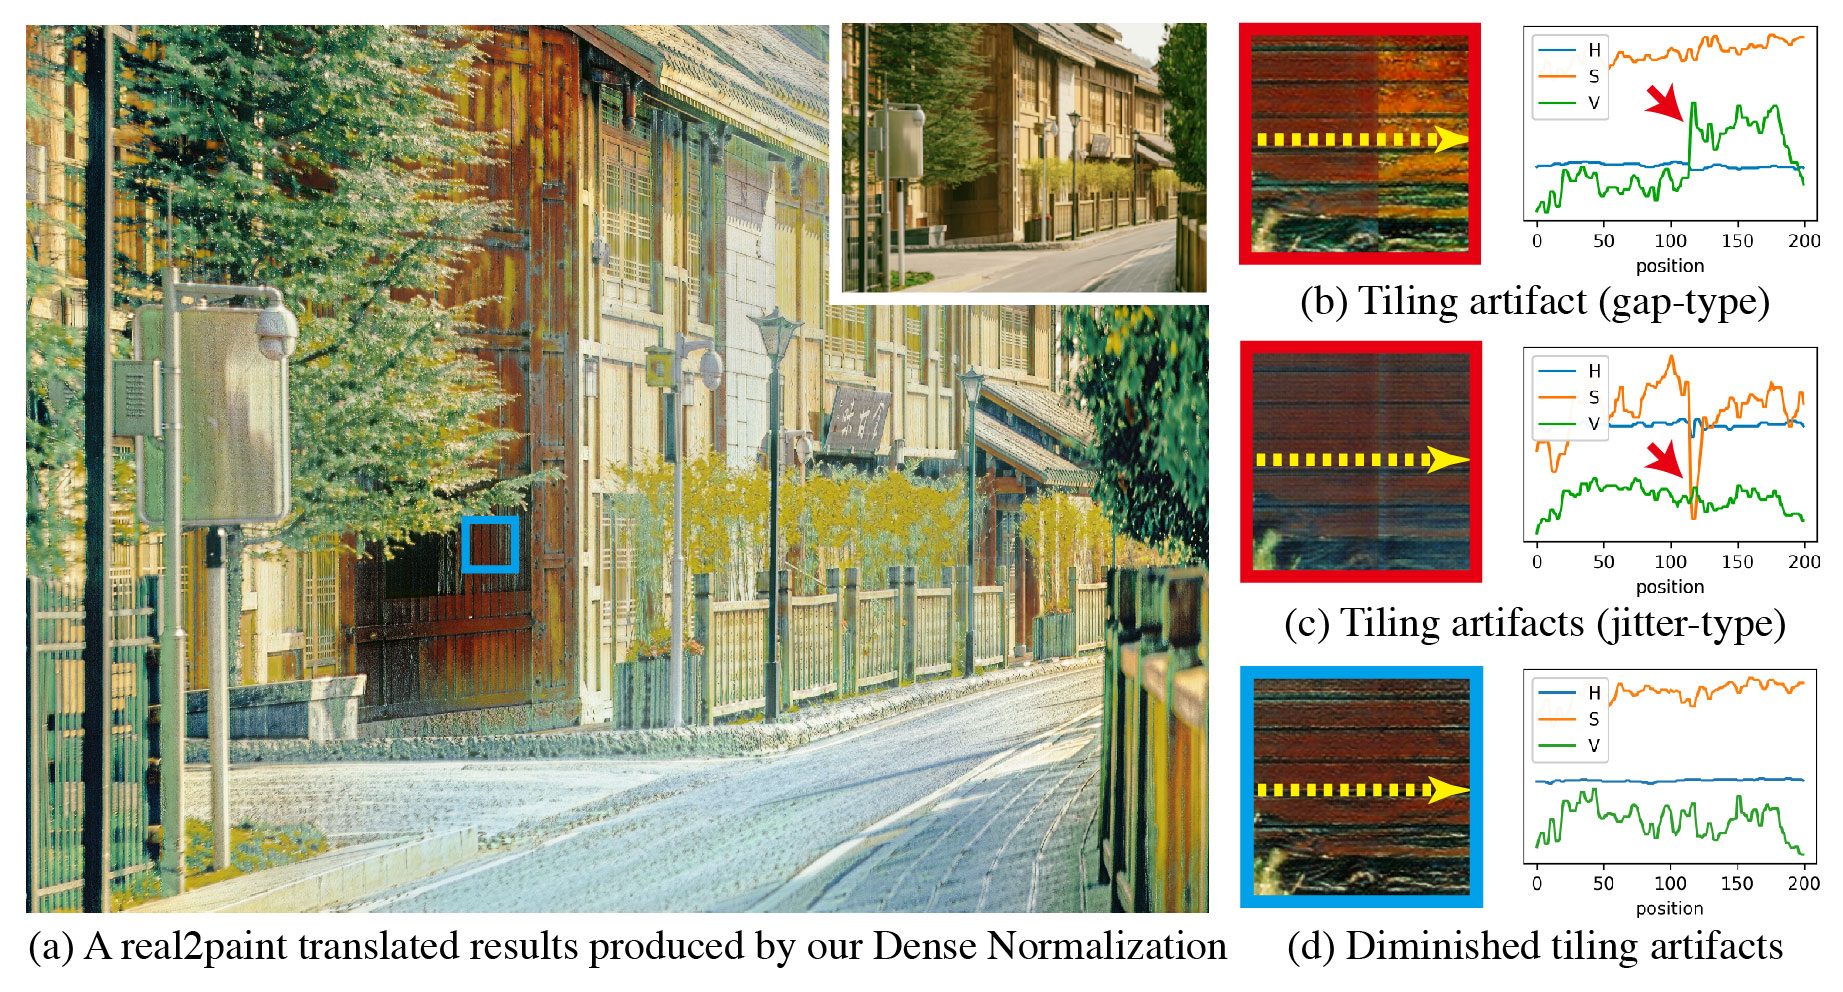


 https://github.com/Kaminyou/Dense-Normalization